Step-By-Step Guide to Building a Terrarium
November 03, 2025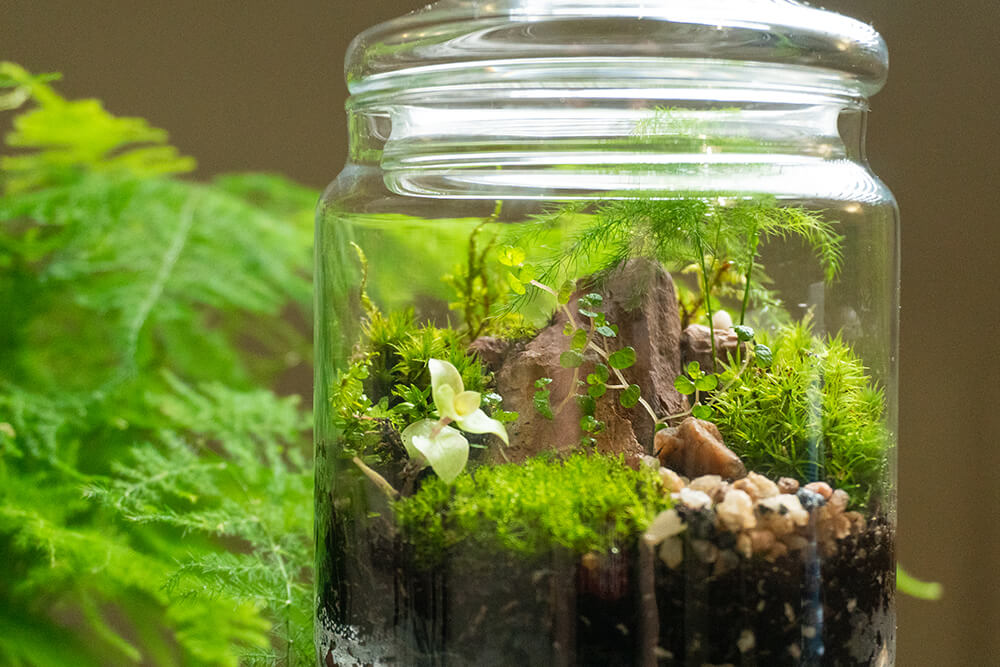
Looking for a fascinating way to bring nature indoors and learn about essential environmental processes? Build a terrarium!
What is a Terrarium, and How Does it Work?
At its heart, a terrarium is a tiny, enclosed garden housed within a transparent container, usually made of glass or plastic. What makes it so captivating is the self-sustaining water cycle it demonstrates. As light and warmth enter the terrarium, water evaporates from the plants (through transpiration) and the soil. Because the environment is sealed, this water vapor rises and then condenses on the cooler inner surfaces of the container. Eventually, these water droplets become heavy enough to fall back down into the soil as precipitation, ready to begin the cycle anew!
The Benefits of Building a Terrarium
Creating a terrarium isn’t just a fun project; it’s also a fantastic way to introduce the concept of the water cycle to children in a hands-on manner. They get to witness evaporation, condensation, and precipitation firsthand! Beyond its educational value, a terrarium is a low-maintenance way to add greenery to your home and a wonderful outlet for creativity. Kids can personalize their tiny gardens with different plants and a variety of imaginative decorations.
Your Terrarium Toolkit: Materials You’ll Need
- A clear, sealable container
- Small stones or pea gravel
- Potting mix
- Small indoor or tropical plant varieties
- Optional: Horticultural charcoal
Let’s Get Started: Building Your Miniature Ecosystem
1). Selecting Your Vessel: You can use various clear containers like glass jars, old aquariums, clear plastic bottles, or even some food containers. The key is to ensure you have enough room to work inside for planting and maintenance.
2). Preparing the Container: Wash your chosen container thoroughly with soap and water, rinse it completely, and allow it to dry.
3). Creating a Drainage Layer: Begin by adding a ½-inch layer of pea gravel or small stones to the bottom of small containers, and up to 1 ½ inches for larger ones. This layer mimics the bedrock in natural environments, allowing excess water to drain away from the plant roots. For added freshness, you can sprinkle a bit of horticultural charcoal (not barbecue charcoal) over the gravel. This is optional and may not be necessary if your terrarium maintains balanced moisture levels.
4). Adding the Growing Medium: Next, fill the container about one-third to one-half full with moist potting soil. The exact amount will depend on the size of your container and the root systems of your plants. It’s crucial to use a sterilized potting mix to prevent the growth of molds and fungi (small bags are readily available at most garden centers).
The moisture level of the soil when you add it is important. Mix water into the soil until it clumps together when squeezed but doesn’t release any water. If it’s too wet, let it dry slightly. Once it reaches the right consistency, carefully place it in your container, trying to avoid getting soil on the sides above the soil line.
Many commercial potting mixes contain slow-release fertilizers. If yours doesn’t, you might consider adding a small amount of these pellets or an organic fertilizer like worm castings before planting. Remember that you want your plants to grow slowly and stay relatively small, so don’t over-fertilize.
5). Planting Your Miniature Garden: Choose small, slow-growing plants that thrive in humid conditions. If your terrarium will primarily be viewed from one side, place taller plants in the back and shorter ones in the front. If it will be viewed from all sides or rotated, position taller plants in the center and shorter ones around the perimeter. You’ll find a good selection of suitable plants in the indoor plant section of most garden centers, often in 2 to 4-inch pots.
Consider these plant options:
- African violet
- Artillery fern
- False aralia
- Spider plant
- Jade plant
- Miniature peperomia
- Nerve plant
- Strawberry begonia
- Oxalis (Pink polka dot plant)
- Prayer plant
- Swedish ivy
- Small ferns
- Small peace lilies
- Small philodendrons
- Moss
6). Adding Decorative Touches: Enhance your miniature landscape with creative elements like decorative stones, tiny animal figurines, small bridges, or even a small mirror to represent a pond.
7). Sealing and Observing: After planting, secure the lid on your container or cover it with plastic wrap. Place the terrarium in a location with indirect sunlight. Direct sun can lead to excessive evaporation and potentially harm your plants. Observe your terrarium closely for the first few days to ensure the moisture level is correct. You should see a light condensation on the sides and top when it’s in bright light. If there’s no moisture, add a little water. If the sides are constantly very wet and obstruct your view, remove the cover for a few hours to allow some excess moisture to escape.
8). Ongoing Maintenance: Check on your terrarium regularly. Prune any plants that are growing too quickly or remove any dead leaves. Try to keep plant leaves from constantly touching the container walls to prevent excessive moisture buildup. Also, monitor the water levels, as some water will be lost over time.
This guide is inspired by the resources and educational materials provided by KidsGardening.org, a non-profit organization dedicated to supporting garden-based learning.