Plant Propagation Techniques: How to Propagate Plants For Beginners
June 12, 2026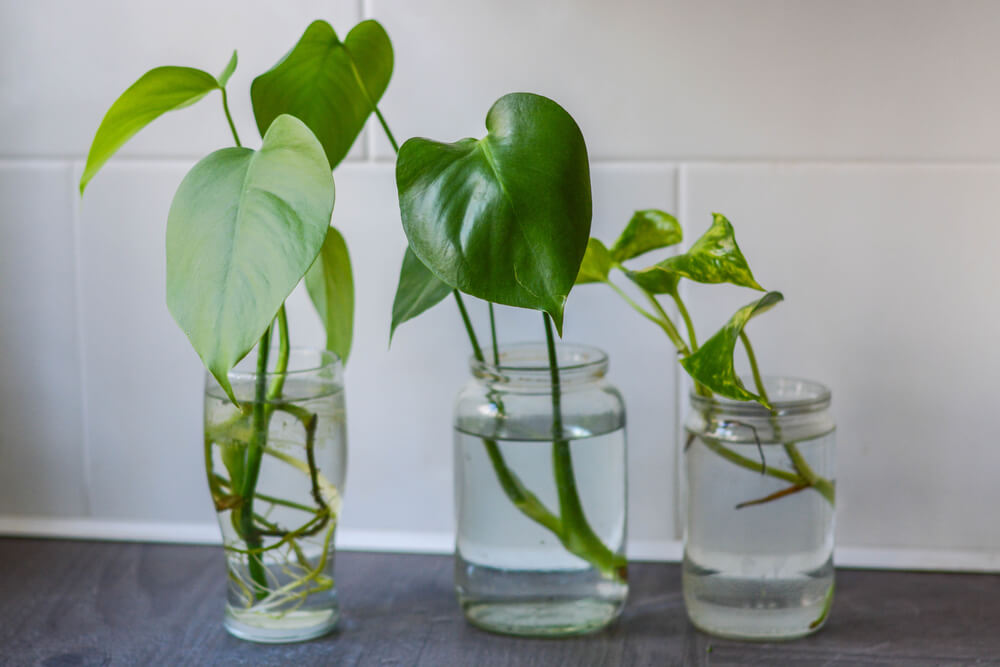
If you’re a houseplant lover who made a promise not to buy any more plants… we have good news for you! You can grow your collection without spending a dime. Below we’ve explained the best plant propagation techniques for pothos, succulents, and more. All it takes is a few basic supplies and a lot of patience.
Whether you’re propagating plants in Lancaster, Harrisburg, York, or beyond, local conditions can impact your success. Factors like mineral-rich tap water, fluctuating indoor humidity, and limited natural light during the winter can all influence root growth. Fortunately, following this plant propagation guide can help your cuttings thrive.
Shop Local Plants
Don’t have the patience for propagating? Visit your nearest Stauffers of Kissel Hill for dozens of different houseplants and expert help from our gardening team. We know all about native plants, growing conditions in Central PA, and more. Find us in Lititz, Lancaster, Mechanicsburg, York, Dover, Linglestown, and Hummelstown.
Understanding the Basics of Plant Propagation
What is plant propagation? Propagation is the act of multiplying your plants. There are a number of plant propagation techniques, including seed starting and cloning.
When most people talk about propagation, however, they are usually referring to asexual propagation. This is the process of reproducing plants from a single parent plant through division, cutting, layering, or grafting. The resulting growth is genetically identical to the parent plant—in other words, a clone.
What is the Difference Between Plant Propagation and Reproduction?
Plant reproduction encompasses both sexual (seeds) and asexual methods. Most of the time, plant propagation refers to the asexual reproduction of a plant using vegetative parts like cuttings, rhizomes, or leaves.
The benefit of asexual plant propagation techniques is that you create new plants that are already semi-mature, which means less waiting around for seeds to sprout.
This plant propagation guide will cover the easiest, beginner-friendly techniques for those just getting started.
Plant Propagation Techniques At A Glance
| Plant Propagation Technique | How It Works | Best For |
| Stem Cuttings | Cut a healthy stem and place it in water until roots develop. | Pothos, philodendrons, spider plants, inch plants, and more |
| Root Division | Split an established plant and root system into smaller sections. | ZZ plants, snake plants, ferns, hostas, monsteras, and irises |
| Succulent Propagation | Remove a leaf, pad, stem, or pup; let it callus over and grow roots; replant it. | Hens and chicks, jade plants, prickly pear cacti, and other succulents |
Stem Cuttings: Best For Pothos and Philodendrons
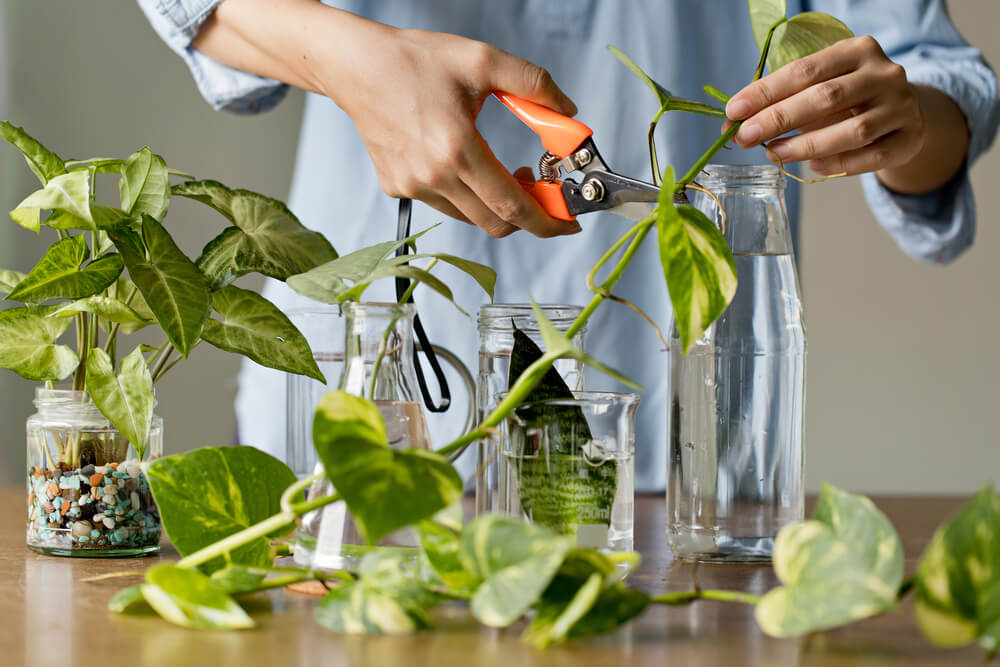
Stem cutting is where you clip off a piece of a thriving plant, place it in water, and wait for roots to grow. Cutting is the most popular plant propagation method because it presents the lowest risk to the parent plant.
First-time propagator? This is the most beginner-friendly plant propagation technique! Start with a healthy, hardy, easy-to-grow plant that you’ve had for a while. You want one with a standard and well-developed root system. This ensures the parent plant can handle the cut.
Some houseplants are easier to propagate than others. We recommend pothos, philodendron, inch plants, and spider plants for your first try. Once you’ve chosen your target, it’s time to get cutting!
Supplies You’ll Need:
- A healthy plant
- A small vase, mason jar, or other glass container
- Water
- Scissors
- Patience
How to Propagate Plants From Cuttings
- Find an Area to Cut: The best cuttings contain two to three leaves and are around four to eight inches long. From there, find the node—the knobby bump opposite where the stems and leaves attach on the main stem.
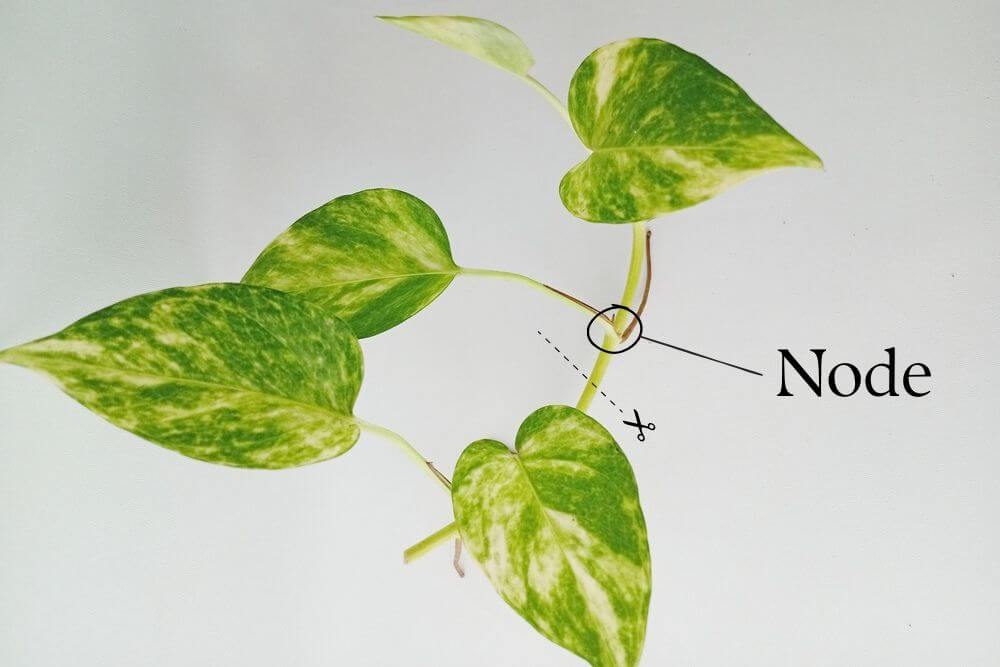
- Make Your Cut: With clean, sharp scissors, make a diagonal cut just below the lowest node of your cutting. This diagonal cut helps the new plant take in more water and nutrients, and the node at the bottom is where new roots will develop.
- Fill Your Container: Fill a tall, skinny glass with water and place your cutting into the water. Using a clear container will help you track root growth more easily, but any cup will do! Make sure the node is fully submerged, but not the leaves—they will rot in the water. You may need to remove leaves that are growing near the bottom node.
- Wait One Week: In about a week, roots will begin to sprout from the bottom of your cutting. Be sure to top off your water level so that the roots remain just below the surface.
- Change the Water: Once or twice a week (or whenever it gets cloudy), completely change the water for a fresh batch.
- Watch Roots Grow: Now it’s time to wait. Over the course of several weeks, roots will grow longer and longer. Once the root system has developed and you have at least one strong root that is about four inches long, it’s time to pot your new plant!
- Pot Your Plant: Use a lightweight potting mix in a planter that is just big enough for your cutting. Place your potted plant in indirect light until you start to see new growth. From there, you can move the plant to an area with its desired light level.
- Keep It Moist: Since living in water is all your cutting has ever known, soil moisture is key. Water your new plant heavily in the beginning to help it transition into life in the soil. Keep the soil moist but not soaking to prevent root rot.
- Space Out Waterings: Slowly spread out your waterings until the plant is on a normal watering schedule. Congratulations! You’ve propagated your first plant.
Stauffers Pro Tip: Struggling with keeping your plant moist enough? Some members of our garden team like to put a terrarium top or plastic bag over the plant to help it retain moisture—just be sure to poke some ventilation holes for airflow.
Root Division: Best For Rhizomes and Multi-Stem Plants
Root division is a plant propagation technique where you divide a plant and its root system into smaller sections. The best contenders for this kind of division are clumping plants, perennials, and plants with tight crowns.
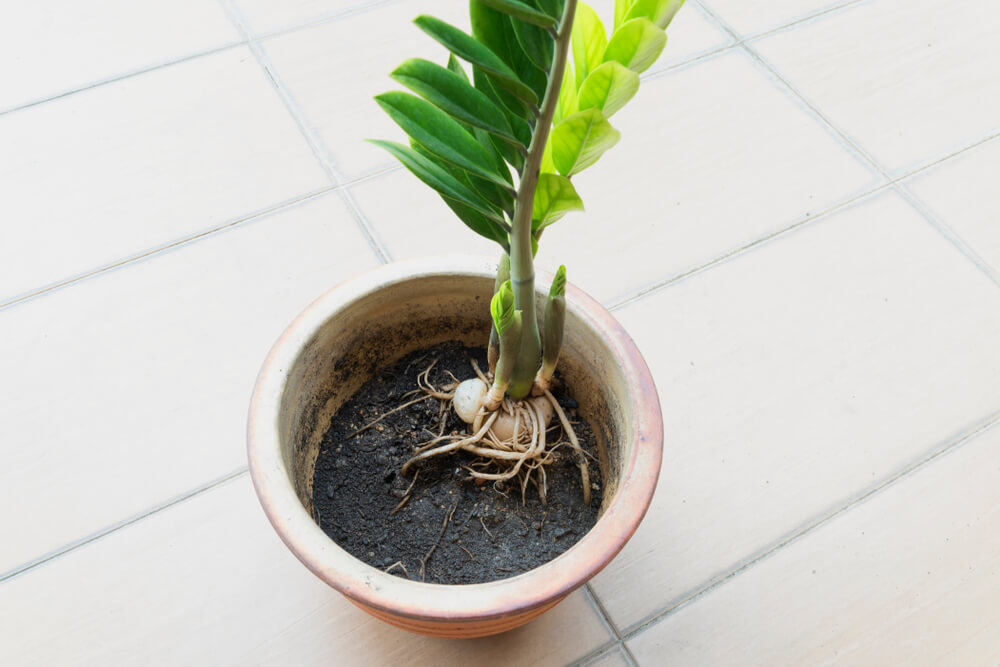
If you’ve ever potted a ZZ plant, you’ll know its roots look very different from a typical houseplant. This is because they have rhizomes, which are tough, bulb-like root systems. Plants with rhizomes are incredibly easy to propagate through division, as are plants with multiple stems that can be pulled apart.
Some great options for this plant propagation method are: ZZ plants, snake plants, hostas, ferns, monsteras, and irises.
Supplies You’ll Need:
- A clean, sharp knife
- A planter or pot
- Potting soil
How to Propagate Plants With Root Division
- Remove the Parent: Take your parent plant out of its pot. Gently loosen the dirt from its roots until you can easily see their structure.
- Plan Your Division: Decide how many plants you want at the end of this propagation process. Examine the roots and figure out how you want to divide it. Look for natural clumps to help you pull the plant apart.
- Separate the Plant: Start with your hands. Try to separate the root system into the desired number of plants. If the root ball is too strong, bring out the knife. For plants with one rhizome, cut the woody bulb in half so both sections have healthy roots and a strong bud. Make sure you don’t harm the stems!
For plants with multiple rhizomes, choose a spot between them; it will be easier to cut. For plants with multiple stems, start by gently untangling the roots until you can separate the clumps. You may need a knife to cut through any knots, but the less damage you do to the roots and stems, the better your outcome will be.
- Let the Rhizomes Callus (Optional): Our gardening team recommends letting the cut pieces of your rhizomes sit for a day. This lets the wounds dry and forms a protective layer over the cut, making them less likely to rot.
- Repot: Now you just repot your new, smaller plants. And don’t forget about the parent plant! Unless it was rootbound (meaning it had outgrown its old pot), you’ll likely need to downsize its planter. Rhizomes don’t need to be planted too deep—a few inches will do.
- Keep An Eye Out: Monitor your new plants for their first few weeks. While they aren’t as unstable as new cuttings, they are still at risk for diseases and may be more sensitive to water and light as they heal their roots. Keeping a close eye on them will help you identify any pest problems early.
Stauffers Pro Tip: If you’re struggling to divide your plants without cutting the stems, we relate. Multi-stem plants can be difficult, but don’t worry! Any stems that don’t make it through the division can be propagated as a cutting. This way, nothing goes to waste.
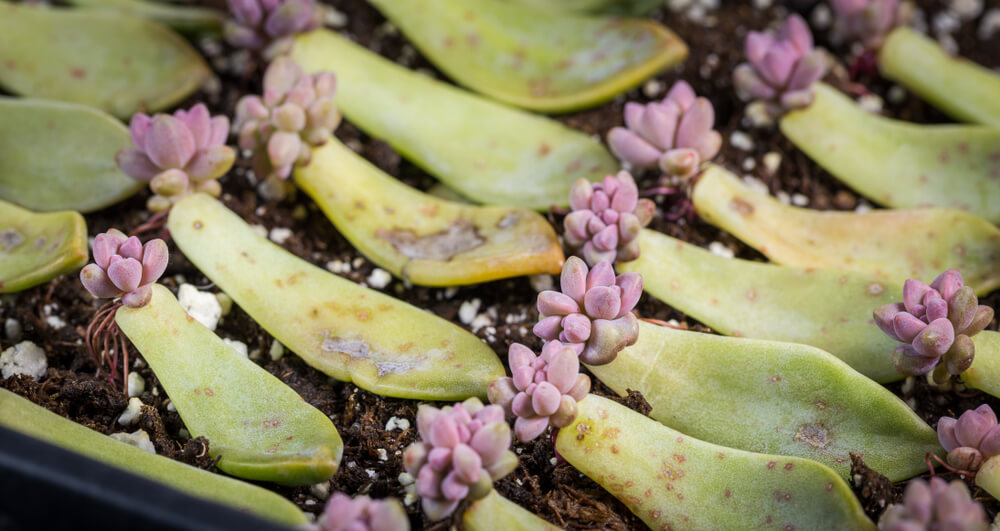
Pad Propagation: Best For Cacti and Succulents
Succulent propagation is done by removing a pad, stem, or pup (baby plant growing at the base of the parent) and replanting it. This plant propagation technique is similar to leaf cutting, but requires a few unique steps to see success.
Succulents and cacti are beloved houseplants due to their compact size and easy maintenance. But they’re also incredibly easy to propagate! We’ll be focusing on succulents that have small, individual sections called “pads” (like prickly pear cacti) or flat leaves (like hens and chicks).
Supplies You’ll Need
- Succulent/cacti potting mix
- Planters or pots
- Tongs or thick gloves (for handling prickly cacti)
- Sharp, clean scissors or a knife
How to Propagate Succulents
- Identify Your Target: Locate the pads or leaves on your plant. These are the flat, separate segments that grow from the main body of the plant. Choose ones that are established and medium-large in size.
- Twist and Pull: Gently twist and pull off the leaves from the main plant. If it’s putting up a fight, you may need to use a knife or scissors. For prickly cacti, use tongs to remove the pad. Do not break the leaf in the middle. The nodes at the base of the leaf are essential for root development.
- Let Them Callus: Place your pads or leaves on a paper towel in indirect, medium light for 2–3 days. This allows them to dry out and callus over, so they don’t take up too much water and drown once planted.
- Move Them to Their New Home: Once they’ve callused over, move your leaves to a pot. Fill your pots nearly all the way with potting soil, then layer the pads or leaves on top. The ends of the leaves don’t need to be touching the soil, just laying on top of it.
- Mist: Over the next few weeks, keep the soil moist but not too wet. We recommend misting water every day or two to keep the soil moist. Within a few weeks, you’ll notice roots and new leaves beginning to form. Don’t worry if your original leaf begins to shrivel—it’s providing nutrients to the new plant to help it grow.
- Plant Them: Once your new succulents or cacti have grown roots, you can plant them in their pots. Slow your daily watering as you approach planting day, and be sure that your potting mix is well-drained. Your new plants should take root and continue to grow over the next few weeks.
Stauffers Pro Tip: If you have a leggy succulent or several pups at the base, you can follow similar steps. Start by cutting the stem or pup, setting it aside for a few days, and then planting it in fresh soil. Spray it with water every day for a few weeks until the roots establish, and then return to a regular watering schedule.
Advanced Plant Propagation Techniques
Since this plant propagation guide is focused on beginners, we won’t cover the advanced techniques today. But as you grow your gardening knowledge, you can graduate to the next level of propagation.
- Layering: Bend an attached stem close to the soil and bury it until it roots. Once roots appear, cut the plant and let it grow on its own.
- Grafting or Budding: If you’ve ever wondered, “Can you propagate different plants together?” then this technique is for you. Cut a stem (or bud) from one plant and combine it with another so they form one unit.
Common Questions About Propagating Plants
What are the most common propagation issues people run into?
In our experience, most beginners struggle with root rot, failure to callus, and light shock. Your propagations are sensitive. Keep them in indirect light, give them enough time to callus over, avoid overwatering, and don’t transplant them too early. You want the roots to be strong enough to survive the transition to soil.
What is the best time of year to propagate plants indoors in Pennsylvania?
Early spring is the best time to propagate because the longer days and warmer temperatures stimulate your plant’s growth hormones.
When should I plant my propagated plants?
You can plant your cuttings as soon as they have a strong root at least four inches long. Divided plants can be potted right away, and succulents can be planted once new roots have started to sprout.
But just because roots have formed doesn’t mean you have to plant them right away. Cuttings can survive in just water for months or even years, so don’t be afraid to keep them around for decoration.
Can you propagate any plant with cuttings or division?
No, you can’t propagate every single plant. Certain specialized plants—like annual vegetables, for instance—rely solely on seeds. But most common perennials and houseplants you can propagate with cuttings or division.
Can you use tap water to propagate plants in Central PA?
Yes, you can use tap water to propagate plants. Every county’s water is different. In Lancaster County, our water is known for its mineral content and chlorine. This won’t affect hardy plants, but sensitive species might experience slower root growth.
If you’re worried about that, leave a glass of water on your counter for 24 hours to let the chlorine evaporate. Remember to refresh your water frequently, or just use filtered water!
Shop Easy-To-Propagate Plants At Stauffers
Growing your houseplant collection has never been easier. Stock up on easy-to-propagate plants at your nearest Home & Garden Center and try your hand at these techniques.